Saturday, January 30, 2010

The Outback's Mac-a-Roo and Cheese

Even though I have been trying to prepare meals that are a bit more health-conscious, sometimes you just need to splurge. This knock-off of the steakhouse's popular kid's meal is perfect for indulging, especially on a cold winter's night.

For years, I only ordered Mac-a-Roo and Cheese at the Outback - even as an adult (at least, until I discovered the wonder that is Alice Spring's Chicken). And now, Ryan enjoys it too, so I was excited to find a version to try at home.

I was skeptical about using Velveeta. I'm not afraid of processed food, but the idea of such a cheese really kind of grosses me out. Even as I was cooking, I sampled a piece of the cheese and - blech. I thought there was no way I'd enjoy this.

But the plastic-cheese flavor totally fades and combines with the roux and paprika to really form a yummy, albeit unhealthy, dinner. Ryan, who is not a big dinner-eater, gobbled it up and has requested it several times since.

I will definitely make this again (did I mention that it was super easy and fast?) and will probably make extra to portion out in single-serving sizes for fast lunches.


12 oz. Package of Medium Size Rigatoni Pasta
1/2 LB Store Brand Processed Cheese Food (cubed)
3 Tbsp. Butter
2 Tbsp. Flour
1/4 tsp. Salt
1/8 tsp. Paprika
1 1/2 C. Milk


Preparation:
Prepare Rigatoni using package instructions. Drain and set aside. In a large saucepan on medium heat melt butter and add flour, stirring constantly. Mixture should thicken. When flour thickens add milk, salt, paprika, and cheese cubes. Stirring constantly until the sauce thickens but yet is smooth. The cheese sauce should resemble an extra thick cream. If mixture is to thick a little more milk may be added. Pour the drained pasta in the sauce and gently stir well. When pasta is completely coated with sauce mixed well the Mac A Roo is ready to serve.

Thursday, January 28, 2010

Weight-Watchers Crockpot Chicken Taco Chili

One of my message boards has been talking about this Crockpot Chicken Taco Chili (from Gina's WW Recipes - full of awesome stuff!) and I was really excited to try it out.

I've said this a thousand times, but there is nothing like dumping stuff into the crockpot and coming back to it hours later and poof- there's dinner. Whether you're working crazy hours, or dealing with nutty kids, or really just don't feel like cooking, this is an awesome meal for you.

And I would NEVER have guessed it was so figure-friendly if I didn't know it specifically came from a WW blog. It was just SO AMAZINGLY DELICIOUS - I couldn't figure out how it could be good for you.

Make this tonight - you will not be sorry.


Ingredients
  • 1 onion, chopped
  • 1 16-oz can black beans
  • 1 16-oz can kidney beans
  • 1 8-oz can tomato sauce
  • 10 oz package frozen corn kernels
  • 2 14.5-oz cans diced tomatoes w/chilies
  • 1 packet taco seasoning
  • 1 tbsp cumin
  • 1 tbsp chili powder
  • 24 0z. (3) boneless skinless chicken breasts
  • chili peppers, chopped (optional)
  • chopped fresh cilantro
Combine beans, onion, chili peppers, corn, tomato sauce, cumin, chili powder and taco seasoning in a slow cooker. Place chicken on top and cover. Cook on low for 10 hours or on high for 6 hours. Half hour before serving, remove chicken and shred. Return chicken to slow cooker and stir in. Top with fresh cilantro. Also try it with low fat cheese and sour cream (extra points).

Saturday, January 23, 2010

Sloppy Brookes

Ryan really loves our friends Brooke and Joe and associates their names together. So I probably shouldn't have been surprised when the following conversation took place a few weeks ago.


We were about to sit for dinner, and he asked what we were having; I told him I made Sloppy Joes. He thought about that for a minute and answered, "And Sloppy Brookes, too?"

I, of course, told our friends about this immediately, and Brooke declared that there SHOULD be a Sloppy Brooke sandwich. We immediately started collaborating and discussing Brooke's favorite foods: chocolate, cheese, and coffee.

I didn't really think cheese belonged in that group, but Brooke reminded me that cream cheese would work just fine. We brainstormed some more and finally...

The Sloppy Brooke was born.


I selected Brooke's favorite chocolate chip cookie for the "bread" part of the sandwich (I did not enlarge them like she suggests, though I would for sure do that if I was making them to stand alone), and stuffed it with a mocha cream cheese filling. Since Brooke drinks hazelnut coffee, I rolled the sandwiches in roasted hazelnuts.

Ryan and I had a blast concocting these, and they were delicious! The mocha in the cream cheese is subtle and not overpowering (and the leftovers are awesome on your morning bagel!), and the roasted nuts made me feel like I was eating Nutella. And the cookies... oh, the cookies! On their own they are fantastic; as part of this sandwich, they are divine.

Brooke, we hope you enjoy these little treats! Next up, a Sloppy Chily...


Ingredients

For the cookies:
  • 2 cups all-purpose flour
  • 1/2 teaspoon baking soda
  • 1/2 teaspoon salt
  • 3/4 cup unsalted butter, melted
  • 1 cup packed brown sugar
  • 1/2 cup white sugar
  • 1 tablespoon vanilla extract
  • 1 egg
  • 1 egg yolk
  • 2 cups semisweet chocolate chips

For the mocha cream cheese filling:
  • 2 cups cream cheese
  • 2 rounded tablespoons hot chocolate mix
  • 1-2 tablespoons sugar
  • 1/4 cup espresso
  • 1 cup hazelnuts, chopped

To make the cookies:
Preheat the oven to 325 degrees F (165 degrees C). Grease cookie sheets or line with parchment paper. Sift together the flour, baking soda and salt; set aside. In a medium bowl, cream together the melted butter, brown sugar and white sugar until well blended. Beat in the vanilla, egg, and egg yolk until light and creamy. Mix in the sifted ingredients until just blended. Stir in the chocolate chips by hand using a wooden spoon. Cover dough and chill for 2 hours.
Drop cookie dough 1/4 cup at a time onto the prepared cookie sheets. Cookies should be about 3 inches apart. Bake for 15 to 17 minutes in the preheated oven, or until the edges are lightly toasted. Cool completely on baking sheet.

To make the mocha cream cheese filling:
Combine all ingredients in the bowl of a mixer. Mix on medium speed until smooth and incorporated.

To make the hazelnuts:
Place in a small skillet over medium heat and toast, stirring frequenty, for just a few minutes. Watch them closely - they burn easily!

To assemble:
Take one cookie and drop a spoonful of the cream cheese mixture on the underside. Top with another cookie (so the bottoms of the cookies are "facing" each other). Roll the sides in the roasted hazelnuts; repeat for all cookies.

Win a cookbook!

Visit Picky Palate for your chance to win an awesome cookie cookbook!

Friday, January 22, 2010

Superbowl Snack Throwdown: Mom's Super Easy Kielbasa Bites

Kielbasa was the big winner in the very last week of HighLowAha's blogging contest. I must admit that I wasn't super excited about this one, though, because I'm not a fan of kielbasa. Then again, I don't salami either, and that was the other option... so I assumed this would be a lose-lose week.


However, even though I don't like kielbasa, I actually rather enjoyed this recipe from my mom and may or may not have even eaten quite a few in between snapping photographs. The carmelization adds such an interesting layer of flavor that leaves little guys rather addictive. And really, who doesn't enjoy food on a stick?


This little appetizer shouldn't even be called a "recipe" - it's just so beyond easy that I almost feel like I'm cheating. It takes a bit of time, but not effort; you can easily leave it while it's on the stove to tend to other tasks or dishes.


Ingredients
  • 1 package kielbasa
  • 1 12oz can ginger ale

Chop the kielbasa into 1/2" slices. Place in a medium to large skillet and pour the ginger ale over the top. Bring to a slow boil and then simmer until brown and caramelized and all liquid is gone, stirring occasionally - about 45 minutes to an hour.

Friday, January 15, 2010

Superbowl Snack Throwdown: Mesquite Chicken Pizza Sticks

It is so hard to believe that HighLowAha's Superbowl Snack Throwdown is just a week away from its conclusion. It certainly flew by! Please visit their site to vote for our final secret ingredient.

(BOTH of my peppers went bad - please use your imagination and pretend there are peppers on this pizza!)

This week's ingredient was barbecue sauce, and I thought it was the perfect opportunity to try out this recipe for Mesquite Chicken Pizza that I've been eying on Tasty Kitchen. This is another concoction that is just so fabulously versatile. If you're a whiz in the kitchen, you can make your own pizza dough and even barbecue sauce. If you're more of a throw-together kind of cook, then grab some store-bought dough and a bottle of sauce.


I absolutely loved the flavor combination on this pizza. The smokiness of the seasoning coupled with the sweetness of the barbecue sauce... and of course, everything is made better with handfuls of cheese!

To make these a little "snackier," I cut them into strips. When I was pregnant with Ryan, Pizza Hut had come out with their "Dippin' Strips" pizza, and I LOVED them. So any pizza that's cut into strips is just perfect in my mind... and then you can dunk!


Ingredients
  • 1 pizza crust - homemade or store-bought
  • 7 whole Chicken Tenders
  • 5 dash(es) Mesquite Grilling Seasoning
  • 1 whole Green Pepper, Diced
  • 1 whole Red Pepper, Diced
  • 1 whole Small Red Or White Onion, Diced
  • 2 cups Grated Cheddar Cheese
  • 2-½ cups Grated Mozzarella Cheese
  • 1 cup Smokey Barbecue Sauce, plus more for dipping
  • 2 dash(es) Salt
Preheat oven to 400.

For pizza assembly, spread 1/3 of the total amount of cheese onto crust. Then sprinkle on peppers, onions, and chicken. Add remaining cheese, and salt. Drizzle on any smokey barbecue sauce of your choice.

Bake in 400 degree oven for 12-15 minutes.

Thursday, January 14, 2010

Olive Garden's Salad Dressing

Before I get into the recipe part of this post, check out this little bottle! Years ago, my grandmother had it and I thought it was so freaken cool. It has a little sensor and mixes it up for you as it pours. It also has measurements along the sides for various salad dressing recipes. Awesome!


After awhile, though, hers broke and she couldn't find a replacement anywhere. I was pretty bummed that I couldn't get my hands on my own.

Well, thanks the power of the internet, my dad found them not too long ago and gave me a nice little post-Christmas surprise!


Although I'm excited to try some of the recipes on the bottle, I immediately searched for a new Olive Garden variation. Like many people, my favorite part of the Olive Garden is their dressing. I'm not a huge salad person, but I for sure could make quite a meal out of their salad, especially if you add some tasty breadsticks.

Suffice it to say that my salad was quite enjoyable this week. I tried a knockoff recipe once and it was okay, but not that great. This one is a lot better and might entice me to start eating more salads!


Ingredients
  • 1/2 cup mayonnaise
  • 1/3 cup white vinegar
  • 1 tsp vegetable oil
  • 2 Tbls. corn syrup
  • 2 Tbls. Parmesan cheese
  • 2 Tbls. Romano cheese
  • 1/4 tsp. garlic salt
  • 1/2 tsp. Italian seasoning
  • 1/2 tsp. parsley flakes
  • 1 Tbl. lemon juice
Combine all ingredients in a blender or food processor until well-blended. If dressing is too tart, add sugar to taste.

Wednesday, January 13, 2010

Monkey Oatmeal

My husband bought me Hungry Girl's latest cookbook, 200 Under 200, for Christmas, and so far I really love it. It's full of great breakfast, lunch, and snack ideas that are actually filling but guiltless.


This yummy little oatmeal dish actually seemed like a treat! I think I may have used too much chocolate, though; I have only a canister and not individual packets. I followed the can's instructions for a single serving, but it seemed like a lot. I would definitely cut back next time.


As I'm sure you can imagine, Ryan was pretty sold on this breakfast from the title alone. I doubled it for the two of us, and he actually ended up eating more than I did! He has requested it several times since.


Ingredients
  • 1/3 cup regular oatmeal (not instant)
  • 1 25-calorie packet diet hot cocoa mix
  • 1/2 medium-sized banana, squashed
  • 1/8 tsp cinnamon
  • 1 no-calorie packet Splenda
  • dash salt
Pour hot cocoa mix into glass with cinnamon, sweetener, and salt. Add 1/4 cup hot water and stir thoroughly. Once cocoa has dissolved, add 1/4 cup cold water and stir. Place in refrigerator to chill (note: I totally skipped this step and it was fine). Combine with mashed banana and oats in a medium-sized microwave-safe bowl, and mix well. Microwave for 2 1/2-3 minutes. Give it a stir, and then allow oatmeal to cool and thicken.

Monday, January 11, 2010

Help me help babies

On April 25, I will be joining Team Three Cheers for Babies in the March of Dimes' annual March for Babies.


If you'd like to help us reach our goal, click the link above. We, along with countless of little babies, would appreciate any support!

Three-Cheese Garden Pizza

When Brooke came to do a Pampered Chef show at my house, she made this delicious Three-Cheese Garden Pizza to demo some of her products.


It was so good that I went online to try to find the recipe. Since then, I've made this numerous times. It's so easy and simple to throw together, yet it looks rustically elegant. I love that it's packed full of veggies and nutrition - makes the bowl of ice cream for dessert not count. ;)

I should add, in case anyone is interested, that after watching Brooke's demo, I purchased the "large bar ban" and "garlic press." I don't think I will ever make pizza in anything else besides this piece of stoneware. I can't wait to get more!

Ingredients
  • 1 package refrigerated pizza crust
  • 1 small onion, sliced into rings
  • 1 medium zucchini, sliced
  • 2 plum tomatoes, sliced
  • 1 cup mushrooms, sliced
  • 2 garlic cloves, pressed
  • 1 cup shredded mozzarella
  • 1 cup shredded cheddar
  • 1/4 cup grated parmesan
  • 1 teaspoon Italian seasoning


1. Preheat oven to 400°F. Using lightly floured Baker's Roller™, roll pizza crust into a 14-inch circle on Large Round Stone. Bake crust 7 minutes. Remove from oven; place on Stackable Cooling Rack.
2. Using Ultimate Slice & Grate fitted with v-shaped blade, slice onion, zucchini and tomatoes. Slice mushrooms using Egg Slicer Plus®.
3. Using Garlic Press, press garlic over crust; spread evenly. Sprinkle mozzarella and cheddar cheeses evenly over crust; top evenly with onion, zucchini, mushrooms and tomatoes. Grate Parmesan cheese over vegetables using Deluxe Cheese Grater. Sprinkle with seasoning mix. Bake 15-18 minutes or until crust is golden brown; remove from oven. Cut into wedges using Pizza Cutter.

Sunday, January 10, 2010

Crockpot Tomato Soup

I love making big batches of soup and then freezing it in 2-cup portions - perfect to grab for a nice, yummy lunch on a cold January day.

I have tried tomato-soup variations in the past, but am usually left disappointed. The Crockpot Lady apparently had the same woes, but easily combated the dilemma by creating this delicious tomato soup. She calls it "restaurant quality," and I wholeheartedly agree. This was by far one of the most delicious tomato soups I have ever had - not too acidic, but still full of flavor.


The best part, however, is that there is NO work involved! You spend maybe 90 seconds in prep, and then go about your day while the crockpot does the work.

I didn't really change anything except for the cream part. I realized (as I was about to pour it in, of course) that I only had about 3/4 of a cup of cream. I added maybe 1/2 cup of sour cream and then skim milk for the rest. While I'm sure that's not how she intended, it came out deliciously, and I might just "run out" of cream next time.

Of course, no tomato soup is complete without some sort of grilled sandwich; I served this alongside these paninis.


Ingredients
  • 3lbs vine-ripe tomatoes (I used about 10)
  • 1 onion, chopped
  • 2 cups tomato juice
  • 1 cup cooking sherry
  • 3 tablespoons sugar
  • 1 chicken boullion cube
  • 2 tablespoons chopped fresh basil
  • 2 cups heavy cream
  • salt and pepper to taste
Wash all of your tomatoes, and cut them in quarters. Nope, we're not going to peel the tomatoes, yay! To save your counter top from tomato gook, put your cutting board on a cookie sheet with sides. The juice will then stay inside the cookie sheet.

Put all the tomatoes in your crockpot.

Chop up the onion, and add it. Cover with the tomato juice and sherry, and drop in the boullion cube. Stir in the sugar and chopped basil.

Cover and cook on low for 6-8 hours.

If you'd like your soup to have chunks, go ahead and stir in the cream. If you'd prefer a chunk-free soup, CAREFULLY use an immersible blender to soupify, or blend in small batches in a traditional blender. Then stir in the heavy cream.

Saturday, January 9, 2010

Spice Set Giveaway!

Visit The Clean Eating Mama for several ways to enter to win the When You Don't Know What to Get Spice Set.


(Photograph from Spices Inc.)

Herb-Roasted-Tomato Panini

I guess it was no secret that I wanted a panini press, since I received THREE of them for Christmas this year.

I have been thoroughly enjoying the new addition to my kitchen. Everything tastes better on it - French Toast, quesadillas, you name it. I love having a whole new slew of fast and easy dinners options!

(Of course, you can use a grill pan and a skillet to achieve the panini, but the desired results are so much better on the press!)

I also discovered that the bakery in my Stop and Shop makes awesome multigrain panini-bread - it's labeled just that. It's perfect - crunchy without being too crispy, and it doesn't get soggy very easily. And the flavor is fantastic!


Ingredients
  • 2 pints grape tomatoes
  • 2 tablespoons olive oil
  • basil, divided - 2 tablespoons finely chopped, plus an additional 16 whole leaves
  • 8 slices panini bread
  • 4 wedges Garlic and Herb Lite Laughing Cow cheese
  • 12 slices mozzarella cheese
  • cooking spray

Preheat your oven to 425.

In an oven-safe baking pan, toss tomatoes, olive oil, and chopped basil. Roast for 20-25 minutes, or until tomatoes start bursting. Using a potato masher, smoosh the tomatoes.

Preheat your panini press.

Spread half of a Laughing Cow wedge over each slice of bread. Place a slice and a half on top of each slice of bread (or as much/little as it takes to fit the slice).

Spoon the tomato mixture over 4 slices of bread, and cover with the basil leaves. Top with one of the other slices of bread.

Spritz your panini press with cooking spray and cook according to the manufacturer's instructions.

(Inspired by Rachael Ray.)

Friday, January 8, 2010

Superbowl Snack Throwdown: Crockpot Sloppy "Joeys"

Before I talk about this yummy little sandwich, I want to take a minute and thank each of you. Over the past few months, you have voted for my recipe and helped me throughout HighLowAha's competition. You have passed along voting information to your friends and family through email, Facebook, message boards, etc... and I cannot come close to properly expressing my gratitude.

You can now, however, rest your fingers, as voting is over for the season. For the next three weeks, Kate and I will be judged by Beantown Baker and Struble Suds as always, along with a new guest judge who will actually recreate and sample our recipes.

Now... onto the food!


You all know that I love my crockpot, and I really enjoy using it for entertaining. There's just something so wonderful about throwing things into the pot and actually being able to mingle with your guests.

For that reason, I think that these little Sloppy Joeys (I call them "Joeys" since they are smaller than your regular Joe) are perfect for your football get together. Casual and informal, your guests can even, dare I say, serve themselves quickly in between plays.


Not only are they delicious and full of flavor, but the use of turkey instead of beef makes them slightly better for you, and they are actually really filling. And the ease of preparation? Unbelievable. Brown the turkey, throw it in, and voila. Yumminess.


Ingredients
  • 2 lbs ground turkey
  • 1 onion, diced
  • 1/4 cup water
  • 3 tablespoons worcestershire sauce
  • 1/2 teaspoon salt
  • 1/2 teaspoon hamburger seasoning
  • 1/4-1/2 cup tomato sauce (optional)
  • 12-16 slider rolls
Cook the turkey in a skillet over medium heat until browned, about 8-10 minutes. Drain, and add to crockpot.

Combine the remaining ingredients (except for sauce and rolls) and cook, covered, on low for 3-5 hours.

Check on it about a half hour before the end cooking time. If the mixture appears a little dried out, add some sauce to achieve desired consistency and flavor.

Serve on slider rolls.

(Inspired by Betty Crocker.)

Thursday, January 7, 2010

Breakfast Bowls

My husband gave me The Pioneer Woman's cookbook for Christmas, and I couldn't wait to delve into its yumminess.


One of the first recipes that jumped out at me was this one for "Breakfast Bowls." Breakfast is often of the grab-and-go variety, especially during the week. But since he was home with us last week and our days were more leisurely, I decided to whip up this breakfast.


Well, "whip up" is not really an accurate phrase, because these took a lot longer than I thought they would to be finished. There were just many steps involved and I may have left behind a sink with its fair share of dishes and pans and knives and boards and whatnot.

But don't let that deter you - these were DELICIOUS, and I will for sure make them again. I altered the recipe slightly as I went based on my mood and what I had on hand. I couldn't find the original online.


Ingredients
  • 1 TB butter, plus extra for the bowls
  • 1/2 large onion, diced
  • 2 cups of frozen hash browns, thawed
  • salt/pepper to taste
  • 2 cups egg substitute (or 8 beaten eggs)
  • 3/4 cup milk
  • 6 plum tomatoes, diced
  • 4 green onions, chopped
  • 8 basil leaves, chopped
  • 1 pound breakfast sausage, browned and crumbled
  • 1 cup grated cheddar cheese
  • 1 cup grated Mexican blend cheese
Butter 8 ovenproof bowls or ramekins. Preheat the oven to 325.

In a skillet over medium heat, melt the butter. Add the onion and potatoes.

Season with salt and pepper and cook, stirring occasionally, until the onion is soft, about 5 minutes. Remove from heat and set aside.

In a bowl, lightly beat the eggs and milk. Season with salt and pepper and set aside.

In a bowl, combine the tomatoes, green onions, and basil. Stir and set aside.

To assemble, divide all the ingredients evenly among the bowls in the following order:

  1. Potato-onion mixture
  2. Sausage
  3. Cheddar
  4. Egg mixture
  5. Tomato/green onion/basil mixture
  6. Mexican cheese
Place the bowls on a baking sheet and bake for 10-15 minutes, until the eggs are just set. Keep an eye on the bowls to make sure the eggs don't brown. It's better for the eggs to come out of the oven slightly runny, as they'll continue to set after they're removed from the oven.

Wednesday, January 6, 2010

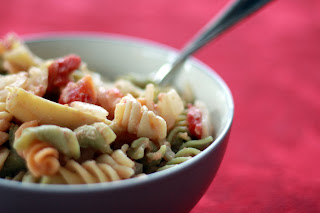
Pasta with Artichokes and Tomatoes

This little pasta dish, courtesy of the Pioneer Woman, was so easy to make and absolutely delicious. It was creamy but light... filling yet not heavy. I have already made it several times, and am sure to make it again!


I altered just a few minor things, so click on the link above if you want her original version.

The leftovers reheat pretty well, but it's also pretty yummy straight out of the fridge.


Ingredients
  • 2 Tablespoons Olive Oil
  • 2 Tablespoons Butter
  • 3 cloves Garlic, Minced
  • ½ whole Medium Onion, Finely Diced
  • 1 can Artichoke Hearts (14.5 Oz. Quartered Or Whole) Drained (and briefly rinsed)
  • 1 can Diced Tomatoes With Juice (14.5 Oz.)
  • 1 cup Heavy Cream
  • ½ cups Chicken Broth (More As Needed)
  • ½ teaspoons Nutmeg
  • Salt And Pepper, to taste
  • 1 pound tri-color rotini
  • 1 cup Parmesan Cheese, Freshly Grated
  • 2 Tablespoons Fresh Chives (or Other Herbs) Chopped

Cook pasta till al dente. Drain and set aside.

Melt olive oil and butter in a large skillet over medium heat. Add onions and garlic and saute for 2 to 3 minutes.

Add artichoke hearts and tomatoes. Stir and cook for 8 to 10 minutes. Reduce heat to low. Stir in cream and chicken broth. Add salt and pepper to taste (do not undersalt!) Cook over low heat until heated through, then turn off heat.

Place drained pasta in a large bowl. Sprinkle with 1 cup Parmesan. Pour sauce over the top. Add chives. Toss lightly to combine and coat; add a tiny bit of reserved pasta water if sauce seems too thick.

Tuesday, January 5, 2010

Candy Cane Kiss Brownie Bites

Usually for Christmas at my cousin Cheryl's house, the spread consists of various finger foods and hors d'oeurves. I asked her what I could contribute, and she suggested a dessert; I knew I wanted to keep with the bite-sized trend.

I thought that these little brownies from Picky Palate would be absolutely perfect. Chocolate + candy canes = perfection, right? I think so.


These yummy little treats were so good. Unlike Jenny, I don't have a mini cheesecake pan, but my mini muffin tin was perfect (I got 3 dozen brownies). My chocolate topping didn't look quite as creamy and smooth as hers, but they sure tasted delightful. What a perfect Christmas treat!

Ingredients
  • 1 brownie mix 9×13 inch size
  • 18 Candy Cane Hershey Kisses
  • 1/2 Cup chocolate chips
  • 2 Tablespoons heavy cream
  • 3 original candy canes, crushed

1. Preheat oven to 350 degrees F. Prepare brownie mix according to package directions and scoop into a mini cheesecake pan or mini muffin tin pan that has been generously sprayed with cooking spray, about 3/4 way full. Press kisses into center of brownie batter, do not push all the way to bottom, some of the tip should stick out the top. Bake for 20-23 minutes or until brownies are cooked through. Let cool completely.

2. Melt chocolate chips in microwave, 30 second intervals until smooth and melted. Stir in cream until silky smooth. You can place back in microwave for 10 seconds to smooth more if needed. Dip tops of brownies into melted chocolate, then sprinkle with crushed candy canes. Serve with a tall glass of milk. Enjoy!!

Monday, January 4, 2010

Pumpkin Cake Brownies

One of my goals for 2010 is to be a little more vigilant about knocking off the last 5 baby pounds and eat a little healthier. (I refuse to use the phrase "New Year's Resolutions" because those are always thrown out the window by Jan 10.) My big downfall, though, is that I just freaken love food - sweets in particular.


So when I stumbled upon this recipe from Hungry Girl, I knew I have found a snack that could satisfy my taste buds while also toning my waist. One of these brownies has way under 200 calories!

They are DELICIOUS - I really felt like I was eating a gooey brownie, so no fake diet food for me. Her recipe has you use a muffin tin for these, but I poured the batter into my 9x9 Pyrex to create brownies instead.

And if you despise pumpkin, fear not - you can't even taste it.


Ingredients
  • 1 box devil’s food cake mix
  • 1 can solid pack pumpkin (15 oz.)

Mix the two ingredients together. Don't add anything else that may be mentioned on the box, such as eggs, oil, or water. The mixture will be very thick and you will be tempted to add in other things to make the batter smoother. DO NOT DO THIS AS IT WILL RUIN EVERYTHING! Place batter into muffin tins (or mini muffin tins) lined with paper, or sprayed with non-stick spray. Bake at 400 degrees for 20 minutes. Makes 12 regular or 36 mini muffins (or 16 brownies!).
Related Posts with Thumbnails